Showing posts with label CST. Show all posts

Thursday, February 2, 2012

Cst challenge

Hi Everybody,
Happy Thursday to you.
Here is a card I have submitted to our weekly CST challenge.  This week is winged things.

The focal image is a cut out design.  I saved this image ages ago and I am sorry, I have no idea where I got it from, but I do have the design saved.  I printed the dragonfly and then used the template to cut out the black silhouette, being careful to leave the outline in tact.  I used the outline to sponge the background color.  I sponged the brown and then the blue with pigment ink and then added sparklie ep to the wings.  Then I glued the cut out black design over the background, offsetting it just a little.  I added the sentiment (actually, I stamped the sentiment first) and then lined everything up.  I added a few layers of matting and I was done.

If you have any questions or would like the template, please email me.

Hope you are having a great day.

Theresa in Kitimat

Wednesday, January 25, 2012

CST challenge

Hi Everybody,
Well, I fianally got busy and did some crafting.  I needed a Birthday card this month for a good online friend so I decided to enter it into the CST challenge (make a birthday card).
This card is a little larger than the regular size, maybe about 5 X 6 1/2, not sure anymore.  I used a SU canvas backgound stamp and close to cocoa ink.  Sponged the edges.  I used a nestability for the scallop circle and my fiskars circle cutter for the inner circle and a nestabilities die for the leaves.
The sentiment is a Fiskars clear stamp set designed by Cloud 9.
I made the flower from pink paper and the how tos are from a video that is in the link further down the page.
I use a Fiskars clear stamp designed by Heidi Grace to stamp the flowers.
The little stamens are made with a Punch Bunch punch.


Here is the inside of the card.

This is a 7 flower pop up and here is the link on how to make it.  The video in the link shows how to fold the paper to make the flowers.
This card is a little time consuming, but the end results are really worth the effort.

I hope you liked my card today and try to make one yourself.  If you do, and have any questions, please email me and I will try to answer them.

Thanks for stopping by and I hope you are having a great week.

Theresa in Kitimat

Thursday, December 15, 2011

CST challenge

Hi Everybody,  Hope your week is going well.
Just 10 short days left until Christmas.  I am almost done.  The house is decorated.  The cards are sent. The shopping for grandkids is done.  Only have to get a few gift cards for my kids.
Since we had a Christmas in July, our Christmas this year will be scaled down a bit.  One of my sons and his family are in Switzerland this year so we celebrated before they left during the summer.

I added a couple cards to the CST challenge this week which was to feature snowmen.


This first card is one I sent to an online friend who has supplied me with scads of card fronts to remake and sell to raise money for our local Relay for Life.  Thanks Sue.

The card measures 4 1/4 X 5 1/2.  I started out by stamping the background snowflakes randomly in different shades of blue. Some of these snowflakes are from Stampin up and the rest are from Inkadinkadoo. I put a wide piece of Scor-tape over this and added clear Glitter Ritz glitter and burnished well.  I did the same thing for the little snowman tag and sorry, I don't know who made this stamp.  I then matted everything, added the ribbon and adhered everything together.  And it was done.

The next card is a very simple easel card. 
I put some kraft paper through the Cuttlebug and sponged it with white craft ink from Stampin Up.  I really like the look of this.  The image is one of my all time favorite Christmas stamps.  It is from Penny Black and I have had it forever.
The sentiment was cuttlebugged with a Sizzix embossing folder.  The inside of the card says "Peace" and "Joy".  It is also done in blue and matted with kraft paper.  This card seems a little plain to me, but I was making it for someone who is not the "blingy" type.


I hope you liked my cards today.
Bye for now and have a great weekend.
Theresa in Kitimat

Wednesday, November 30, 2011

Masculin cards, CST challenge

Hi everybody.  Hope your week is going well. 

 I have been busy finishing my Christmas cards.  All done-woohoo.  I will try hard to get them in the mail before the end of the week.  I have turned over a new leaf.  I usually get my cards  into the mail about Dec 20 knowing that they will arrive late but with the thought that late is better than never and maybe.. people will appreciate them more because the Christmas rush is over and they are still getting mail.  Who am I trying to kid :-)?

Anyway, I am tired of Christmas cards so decided to add cards to the CST challenge that were not Christmas related.  This weeks challenge was to make cards that were for a man or boy.

This first card is one I made a while ago for my Dad.  It is a pretty simple card, but took a fair bit of time to create.  I think the card measures about 5 X 6.  The base card is white cs.  The whale silhouette  is one I had saved to my computer a long time ago.  Sorry, I so not know who made it and I lost the template  in a computer crash.
Anyways, I printd it out and then used that as a template and cut it out of black paper with my X-acto knife.
I glued the cut out to a dyed dryer sheet for the blue background and then cut around everything leaving the narrow border.  I think the finished card ended up looking quite dramatic.


This next card is one I just finished.  It has gone into my "for sale" stash (for Relay for Life).
It is pretty straight forward.  The image and sentiment are from a wonderful stamp set made by Sugarloaf Products.  I have done a search and can't find a link for them so I am not sure if they are still in business.  I used Nestabilities for the scallop and to cut the image out.  The twig is a real twig I got from my yard.
The inside of the card has a sentiment that says "You're HOW old?"  This is also from the same set.

Sorry,  the card is crooked.  I was not very careful when I scanned it.  Got to work on that.

Hope you liked my cards today.  Any questions...just email me.
Wishing you all a Happy Day
Theresa in Kitimat

Saturday, November 19, 2011

CST challenge and SAS4K

Hi everybody,
This is a card I made for our CST challenge this week (make a round card).  This card was fun to make and is pretty straight forward.  I used Nestabilities to cut the base out of white cs. Cut two, scored one at the top for the back and sealed together so it would open.  I then used my Fiscars circle cutter to cut out 2 yellow circles and sandwiched the ribbon between them.  The ribbon is equal all the way around even if it doesn't show up like that in the photo.  I think it was the angle I took the photo at that makes it look so uneven.  This was then adhered to the card base.

I then cut another smaller Nestabilitie scallop circle and embossed it and added that on top.  All that was left to do was add the little elfin girl image (digi stamp that was colored with prisma colors, sorry I could not find where I got the digi from, I am usually good about noting where I get digis, just not this time, my bad.) and add the sentiment (Inkadinkadoo) using nestabilities, once again.  The image is popped up and I inked the edges of all the white cs with yellow ink.

This card will be added to a bunch I will be sending to "Send a Smile 4 Kids".  This seems like a very worthy cause that donates cards to Sick Kids in Vancouver and Stollery in Edmonton so that families and staff can give cards to children that are in need of care.  If you would like to know more about this cause, here is the link.

I was told about this organization by Gail, a new blogging friend.  Gail has to be one of the busiest people I know.  She gets more done in a day than I do in two weeks.  And she is a great crafter.  You really should check out her blog.  It really is an inspiration.

I know I live in BC and Sick Kids is a wonderful hospital, but I thinkI will send cards to Alberta for Stollery. I have a close connection to that hospital.  . I spent countless hours there a few

years ago when my young niece was diagnosed with a brain tumor.  Right after the diagnosis, I went to Alberta to help anyway I could.  I thought I would be caring for my sister's other children while she and my niece stayed in Edmonton for treatments.
Found out treatments were 15 minute bouts of radiation, 5 days a week.  So we decided to travel back and forth for 6 weeks of treatments.  They live a little over an hour out of Edmonton.  I became the designated driver.  My sis was not comfortable driving in the city, especially with so much on her mind.  Many of the trips included visits to Stollery for checkups and support.

Long story, short...sadly, my niece lost her fight at only 13 years old.  But I remember how much she enjoyed receiving hand crafted cards from some of my online friends.  And I remember how much support and caring she and the family received from Stollery.  I would like to pay some of that back and this is one way I can do that.

So that is about it for today.
I hope everyone is having a great weekend and keeping warm.  It is cold here.

Take care.
Theresa in Kitimat


Friday, November 11, 2011

Finally, I'm back

Well, I took a long break from blogging.  Crazy as it is, life does get in the way sometimes.  I was away most of September.  Got home and decided to get a bunch of fall work done.  You know, clean up the yard, put all the gardening tools away, put the wood in for the winter...all that stuff.  Then I was called into work for a few weeks.  I know, I am retired, but my former boss (and friend) had someone quit unexpectedly and was swamped with work so gave me a call.  I was more than happy to help out and enjoyed it immensely.  I really miss the social interaction a person gets when they are working.  But not enough to come out of retirement :-).
Anyway, I was doing some card making over this time.  Just not blogging.  Now I would like to show you some of the stuff I was working on.
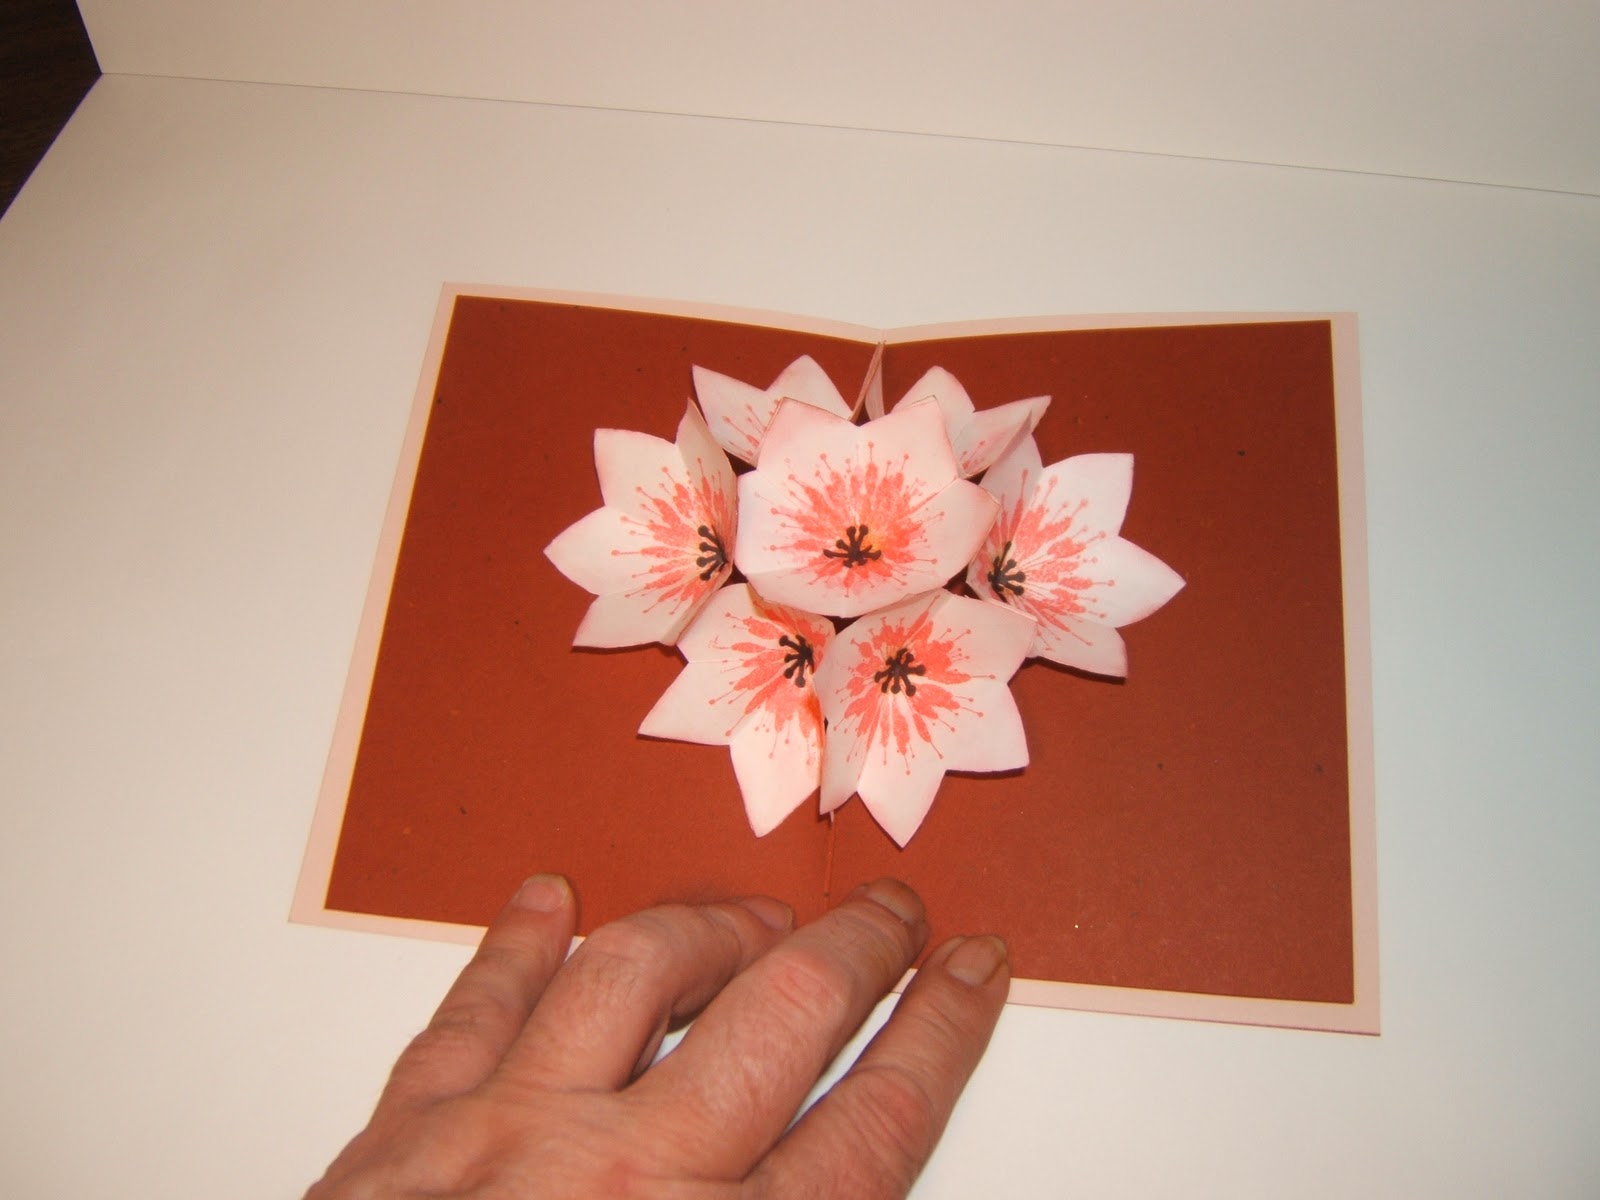
This first card is one I made for a sketch challenge on CST.


I had a few people inquire about how I made the frame so I made another card and took a few pics.  This is the next card I made and a mini tutorial on how I made it.

Although it does not show up well, the light layer is a light blue, not white.  I did bleach out the snowman and snowballs.
First, I used my nestabilities to cut out a rectangle from some thin foam rubber that I have.  If you don't have the foam rubber, you could use a thin fiber batting or even layers of paper towels. And if you don't have nestabilities, you can jsut cut the frame with scissors. 

The next size up of nestabilitie does not make an even frame, so I just cut the frame to the size I wanted.  I then laid the foam frame on the beautiful pliable paper from Paper Ya (a wonderful shop on Granville Island in Vancouver that specializes in paper) that I bought several years ago.  I must admit that I have been hoarding this paper for over seven years.  I know this because I bought it before my DH passed away. 
 
NO MORE HOARDING.
I am getting far to old to hoard.  One day I will die and all my beautiful STUFF would  be left, not especially appreciated by my children who would  have to decide what to do with it all.
Sorry about this rant, but I just wanted to give a heads up to everyone that keeps stuff, because it is just to beautiful to use.  What are you keeping it for?

I then used a smaller nestabilitie and cut out the center of the paper.  This step is important bcause you will want the center of the frame to lay flat.


I then cut a piece of cs the same size as the foam frame and glued the fame to the cs. I put a layer of double sided tape around the inside layer of the foam frame, but did not take off the top release layer just yet.  I centered the paper over the frame and taped it down on the back, mitering the corners to make sharp corners.

Then I clipped the inside corners of the paper, took off the top layer of the tape and taped the paper down to the cs.

All that was left to do was glue down my image that I stamped, colored and cut with the same nestabitlitie that I used to cut the foam.  I then added that to my base card and finished it off.
Here is another card that I did in the same way.

These cards are a lot of fun to make and really, they are simple to do.  One of the nice things about them is that they add a lot of dimention to a card, but squish down flat and can be mailed for regular postage.

I hope you enjoyed my post today. Please leave a comment or email me if you have any questions.

And now I am off to our local Rememberance Day Ceremony.  Please take a moment to remember.

Take care.
Theresa in Kitiamt

Tuesday, August 16, 2011

CST challenge, tip tuesday

This is a card I made for a challenge at Canadian Stamp Talk.  This week's challenge is to make a sympathy card.  Unfortunately, we all need them from time to time and it is always best to have some on hand.

This card is a standard 4 1/4 X 5 1/2.  The base is a light blue by Stampin up.  Not sure which one.  The next layer is cream cs that I sponged the edges with black. I stamped the sentiment (Stampin Up, Brighter tomorrow) on this layer in black.  Now for the TIP.  Always, always, stamp your sentiment before you assemble your card.  Nothing is worse than getting your card together and then stamping the sentiment, only to find out it is crooked.  Ask me, I know.
 To make the image focal point, I stamped the image (retired Stampin Up- Measure of a Life) on vellum with versamark and embossed with black opal embossing powder.  I colored the wings with pearl-ex on the front and the body with purple marker on the back.  I cut this out, leaving a 1 inch border.  I cut a piece of heavy cs just larger than the image.  I layered the cs with a thin piece of foam rubber, and then yellow tissue paper, wrapping the edges around the back and securing with tape.  I then layered the vellum over this, clipped the corners and taped the overlap to the back.  I do not think it shows up in the picture, but this focal point has a raised, puffy feel to it.  I then added the ribbon, assembled everything, and I was done.

I hope you like the card I made today.  I know, I do.

Hope you are all having a great Tuesday.

Theresa in Kitimat

Saturday, August 6, 2011

CST challenge


This is a card I added to the Canadian Stamp Talk challenge (favorite coloring medium).  It is actually a thank you card I made for a friend who gave me the most delicious fresh salmon.  The card is pretty cas.  It is 6X6 folded on the side to make a 3X6 card.  There is no white border around it.  This just showed up because of the way I scanned the card.  The images were stamped on watercolor paper and colored with Stampin Up inks, used as water colors.  I used a retired Stampin Up set called Fishy Friends.  Not sure, exactly, what colors I used.  I sponged the edges of the base card with black.  After everything was colored, the only  thing left was to punch everything out and put it together. 


Btw, I prepared the salmon by keeping it whole, except for the head and tail.  I kept the skin on but removed every bone,  stuffed it and then barbequed it. It tasted amazing.  I have been cooking salmon for many, many years so this is a no brainer for me.

Hope you like my card today.

Happy day to you.

Theresa in Kitimat